How to Add a New Domain on Server5.click Hosting and Configure DNS with Cloudflare (Including MX Records for Email)
How to Add a New Domain on Server5.click and Configure DNS with Cloudflare
Setting up a domain with Server5.click and managing its DNS through Cloudflare is a smart move for better performance, security, and email deliverability. This guide will show you step-by-step how to add your domain, configure A, CNAME, and now also MX records on Cloudflare to point to your Server5.click IP (e.g. 51.15.15.240).
Whether you’re launching a new site or migrating from another host, this tutorial ensures your website and email are correctly routed.
🧰 What You Need
- A domain name (e.g.
example.com) - Active Cloudflare account
- Server5.click hosting credentials
- The IP address of your Server5.click server (example:
51.15.15.240) - Email configuration info from Server5.click (usually
mail.yourdomain.comorserver5.click)
🌐 Step 1: Add Your Domain to Server5.click Hosting
- Log in to your Server5.click CWP user control panel:
- Typically at
https://server5.click:2083(or a custom URL)
- Typically at
- Go to Domains > Add Domain
- Enter your domain name (e.g.
example.com) - Choose the document root (e.g.
/home/example.com) - Click “Create” or “Add Domain”
Now your domain is active on the server, and ready for DNS setup.
☁️ Step 2: Add Your Domain to Cloudflare and Set Nameservers
- Log in to Cloudflare Dashboard
- Click Add Site
- Enter your domain (e.g.
example.com) and click Continue - Select a Free plan (or paid, if needed)
- Cloudflare will scan existing DNS records (you’ll replace them next)
- Click Continue to get your Cloudflare nameservers, for example:
dina.ns.cloudflare.com jake.ns.cloudflare.com - Go to your domain registrar (e.g. Namecheap, GoDaddy) and update nameservers to the ones provided by Cloudflare
- Save and wait for propagation (usually <1 hour)
🔁 Step 3: Configure Cloudflare DNS Records for Server5.click
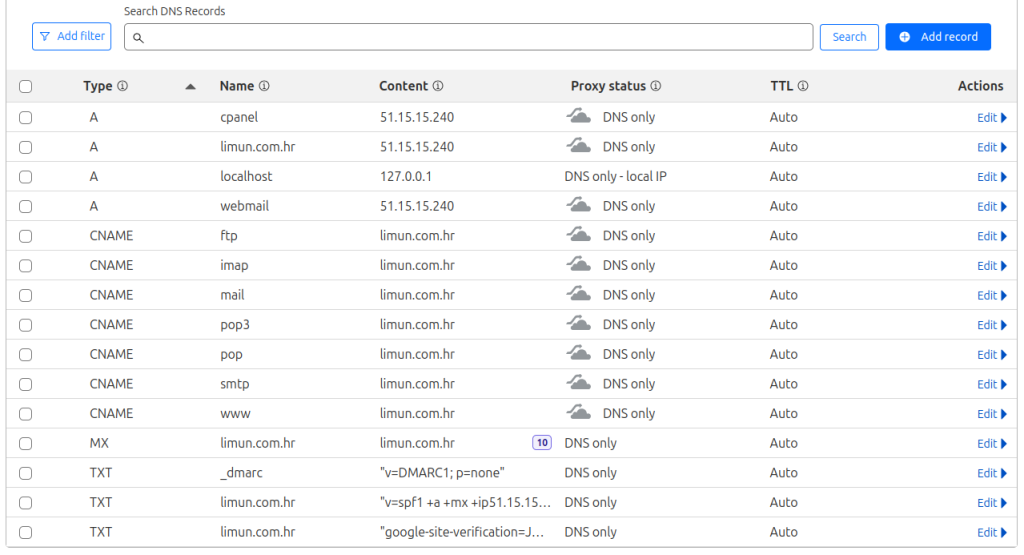
Once your domain is active in Cloudflare, you need to point it to your server.
Important Note: Typically Cloudflare scans your DNS settings and imports it from your Server5 Control Panel if you already added your domain there, so you do not need to change anything.
➕ A Record (Root Domain)
| Type | Name | IPv4 address | Proxy Status |
|---|---|---|---|
| A | @ | 51.15.15.240 | DNS Only or Proxied |
➕ CNAME Record (WWW)
| Type | Name | Target | Proxy Status |
|---|---|---|---|
| CNAME | www | example.com | DNS Only or Proxied |
This ensures both example.com and www.example.com resolve to your website.
📧 Step 4: Configure MX Records for Email Delivery via Server5.click
Important Note: Typically Cloudflare scans your DNS settings and imports it from your Server5 Control Panel if you already added your domain there, so you do not need to change anything.
To send and receive email using your domain, you’ll need to add MX records and supporting DNS entries.
➕ MX Record
| Type | Name | Mail Server | Priority |
|---|---|---|---|
| MX | @ | mail.example.com, or yourdomain.com | 10 |
➡️ Replace mail.example.com with the actual mail server you use (typically you can set this to yourdomain.com.
➕ A Record for Mail Subdomain
| Type | Name | IPv4 Address | Proxy |
|---|---|---|---|
| A | mail | 51.15.15.240 | DNS Only |
⚠️ Important: Do NOT proxy your mail server (set to “DNS Only”). Cloudflare does not proxy mail traffic (SMTP, IMAP, POP).
*No need for this entry if you use yourdomain.com as MX record.
Important Note: Typically Cloudflare scans your DNS settings and imports it from your Server5 Control Panel if you already added your domain there, so you do not need to change anything.
📤 Optional: Add SPF, DKIM, and DMARC Records for Better Email Deliverability
To avoid email being marked as spam, add these records as needed.
✔ SPF Record
| Type | Name | Content | TTL |
|---|---|---|---|
| TXT | @ | v=spf1 a mx ip4:51.15.15.240 ~all | Auto |
✔ DKIM Record
This depends on your email server. If Server5.click provides DKIM keys, it will look like:
| Type | Name | Content |
|---|---|---|
| TXT | default._domainkey | v=DKIM1; k=rsa; p=MIGfMA0G... |
✔ DMARC Record (Basic)
| Type | Name | Content |
|---|---|---|
| TXT | _dmarc | v=DMARC1; p=none; rua=mailto:admin@example.com |
These records help email authentication and improve trust in your domain.
Important Note: Typically Cloudflare scans your DNS settings and imports it from your Server5 Control Panel if you already added your domain there, so you do not need to change anything.
✅ Step 5: Test Your Setup
Once DNS is configured:
- Visit your site in a browser (
https://example.com) — it should load. - Use tools like https://dnschecker.org to verify A, MX, and TXT records.
- Send a test email (if webmail or email client is set up via Server5.click).
- Use https://mxtoolbox.com/ to test your MX, SPF, and DKIM records.
💬 Common Email Ports (If Needed for Mail Clients)
| Protocol | Port | Encryption |
|---|---|---|
| SMTP | 465 / 587 | SSL / STARTTLS |
| IMAP | 993 | SSL |
| POP3 | 995 | SSL |
🧠 Summary
| Task | Status |
|---|---|
| Domain added to Server5.click | ✅ |
| Cloudflare nameservers set | ✅ |
| A and CNAME records configured | ✅ |
| MX and mail A records added | ✅ |
| SPF/DKIM/DMARC added | ✅ (optional) |
🚀 Final Thoughts
Combining Cloudflare DNS with the power of Server5.click hosting ensures a reliable, secure, and high-performance web presence — and now, fully functional email support using your domain.
Make sure your mail-related DNS entries are NOT proxied, and keep your DNS records organized to avoid conflicts or delivery issues. For professional or business email, consider using custom SMTP settings, backups, and monitoring tools.


0 thoughts on “How to Add a New Domain on Server5.click Hosting and Configure DNS with Cloudflare (Including MX Records for Email)”